Preliminaries
This is an integration between zExpense and Business Central, which makes it relevant to you only if you have both a zExpense and a Business Central account. The base currencies in your zExpense and Business Central accounts should be identical.
To install the integration, you need the privileges to install extensions and grant privileges to users in Business Central.
What this integration does
As a user of both zExpense and Business Central, you can use this integration to exchange business data between the two.
Synchronize dimensions
You may synchronize any Business Central dimension with any dimension in zExpense, and you may freely choose which dimensions, if any, you wish to synchronize.
When you synchronize a dimension, dimension choices in zExpense will be overwritten with dimension choices from Business Central. This means that for synchronized dimensions, all changes to dimension choices should be made in Business Central. If you add, remove or change a dimension value in zExpense, the next time dimensions are synchronized, your changes in zExpense will be undone.
Import approved settlements
After a settlement has undergone a complete approval workflow in zExpense, it can be imported into a Business Central journal of your choosing.
When you import settlements (action “Get settlements”), all settlements in zExpense with status “Processed” will be imported, and they will have their status changed to “Closed”. In zExpense, if you have the proper privileges you can go to the page Exports > Economy for a log of settlements that have been imported into Business Central.
Synchronize vendors (zInvoice only)
Users of zInvoice can synchronize their list of vendors between Business Central and zExpense.
As with dimension synchronization, Business Central is considered authoritative on vendors, i.e. any changes you make in Business Central will be propagated to zExpense, while changes made to vendors in zExpense may be overwritten.
Import approved invoices (zInvoice only)
After an invoice has undergone a complete approval workflow in zExpense, it can be imported into Business Central, either to a general journal or as a purchase invoice.
When you import invoices (action “Get invoices”), all invoices in zExpense with status “Processed” will be imported, and they will have their status changed to “Closed”. In zExpense, if you have the proper privileges you can go to the page Exports > Economy for a log of invoices that have been imported into Business Central.
Getting started
To start setup of the integration you need a zExpense API token. Please contact our support staff to get one.
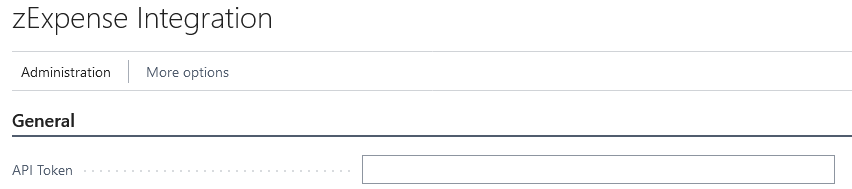
Once you have obtained an API token, search for ‘zExpense integration’ in Business Central to go to the setup page. Copy the token text and paste it into the field ‘API Token’.
If the token is valid and has been copied correctly, several more fields will be made visible, and you can start
Settings explained
Once the API Token field has been filled out and validated, all the fields relevant to the configuration of your integration will be made available as shown below. Fields under the zInvoice heading will only be shown if zInvoice is enabled for your zExpense account.

API Token
This field holds the metaphorical key to your zExpense account, and we use it to verify your identity such that only someone with the correct key can access your zExpense data. The token should never be shared with anyone outside your organisation. The value of this field should not be changed unless you are advised by our support staff that you must change your API token.
Settlement import settings
Import to Gen.Journal Template and Import to Gen.Journal Batch
These two together indicate the general journal where your imported settlements will be created as journal lines upon import.
Only get the amount in base currency
In zExpense and Business Central alike, an expense will have a certain amount in your base currency, but if it’s made in a foreign currency, then this currency, the foreign currency amount and the exchange rate may also be noted on the expense. If this option is enabled, then we will ignore foreign currency information on settlement items imported from zExpense, and the resulting journal lines will be recorded as being made in your account’s base currency.
Note format
You can use this field to customize the Description field. Certain terms enclosed by curly brackets will be replaced by values from imported items. Here’s a list of valid terms:
- {settlement_id}: The settlement number of the settlement from which the journal entry was generated.
- {note}: The contents of the settlement item’s note field, if it has one.
- {note2}: The contents of the settlement item’s note2 field, if it has one. Be aware that depending on your zExpense configuration, the user will likely see this field as having a different name, but here it should always be denoted as “{note2}” regardless of the name it’s given in zExpense.
- {user_name}: The full name of the owner of the settlement item.
- {user_initials}: The initials (as entered on the user form) of the owner of the settlement item.
- {user_employee_no}: The employee number (as entered on the user form) of the owner of the settlement item.
The default template format is “{user_initials}: {note}”.
Posting date
When importing settlement items to your journal, their booking date will be set to the following:
- Transaction date: For credit card expenses, use the transaction date (if available); otherwise use the date the item was created.
- Import date: Use the current date whenever the settlement is imported into Business Central.
- Credit card booking date (with fallback to transaction date): If the expense is a credit card transaction and a booking date is available, use that; otherwise do the same as for Transaction date.
Include attachments
If this option is enabled and an imported settlement item has attachments, import them and attach them to the journal line as incoming documents.
Please note that attachments to the settlement header in zExpense are not included; we only include attachments to individual settlement items.
Use settlement number as External Document No.
If this option is enabled, then the External Document No. field will be set to the settlement number for the imported item.
Combine credit lines
If this option is enabled, for each individual settlement we will group contra accounting on new credit lines.
Let’s assume that we have a settlement with 3 expenses: the first for €10 to contra account 1111, the second for €20 to contra account 2222 and the third for €30 to contra account 2222. Each of these will generate a debit line for the same amount but without a contra account. Moreover, a credit line for €10 will be generated for account 1111, and a credit line for €50 will be generated for account 2222, which results in only one payment being made to account 2222 rather than two.
Source of document numbers
This determines how we will fill out the field Document No.
- None: The field will be left blank.
- Journal number series: The number series assigned to the journal will be used. If you have selected this option and no number series is assigned to the journal, you will get an error message the next time you try to import settlements.
- zExpense number series: This option exists for backwards compatibility with our previous integration, and should generally not be used by new users.
New document numbers assigned by…
When filling out the field Document No., this determines which items get the same document numbers.
- Numbered by item: Each item/settlement line will get its own unique Document No.
- Numbered by settlement: Every item/settlement line from the same settlement will get the same Document No., but each settlement will get a unique Document No.
- Numbered by import: Every item/settlement line that is imported in one go will get the same Document No. This means that when you click ‘Get settlements’, then all new journal entries generated at that time will get the same Document No., e.g. ZE01234. The next time you click ‘Get settlements’, all new journal entries generated at that time will get Document No. ZE01235.
zInvoice import settings
Import invoices to
Select how you want your invoices to be imported.
- Purchase Invoice: Imported invoices will be created as Purchase Invoice entries.
- General Ledger: When this value is selected, two new configuration fields are made available: “Import to Journal Template” and “Import to Journal Batch”. Imported invoices will be created as general ledger entries in the ledger specified by “Import to Journal Template” and “Import to Journal Batch”.
Note format
You can use this field to customize the Description field. Certain terms enclosed by curly brackets will be replaced by values from imported invoice lines. Here’s a list of valid terms:
- {settlement_id}: The invoice settlement number of the settlement from which the journal entry was generated.
- {invoice_id}: The zExpense invoice ID. Note that this is an internal zExpense ID, not the invoice number.
- {note}: The contents of the settlement item’s note field, if it has one.
- {user_name}: The full name of the owner of the settlement item.
- {user_initials}: The initials (as entered on the user form) of the owner of the settlement item.
- {user_employee_no}: The employee number (as entered on the user form) of the owner of the settlement item.
- {vendor_name}: The name of the invoice vendor.
The default template format is “{vendor_name}: {note}”.
Include attachments
If this option is enabled, the imported invoice will have its attachments added to its header (if Purchase Invoice) or its general ledger entries (if General Ledger).
Posting date
When importing invoices, their booking date will be set to the following:
- Invoice date: The invoice date specified on the invoice in zExpense.
- Import date: The current date whenever the invoice is imported into Business Central.
Only get the amount in base currency
See “Only get the amount in base currency” under “Settlement import,” only this setting pertains to imported invoices, not settlements.
Dimension settings
Shortcut dimension 1-8
Here you may enter the name of a dimension in zExpense. This will have two effects:
- When you synchronize dimensions, that shortcut dimension will have its values synchronized to the named dimension in zExpense.
- When you import settlements or invoices that include that include the named dimension, then values for the corresponding shortcut dimension will be set on the generated entries.
You may use as many of these as are appropriate to your company, including none.
Job number dimension and Job task number dimension
If you import settlements to a job journal, you may enter the name of zExpense dimensions here. Instead of working with shortcut dimensions, the zExpense dimensions will be synchronized with your job numbers and job task numbers respectively, and when items are imported with a value set for these dimensions, then it will set the Job No. and Job Task No. for the generated journal entry.
Testing
Extension version number
This is not a setting, but merely an informational field showing you the current version of the zExpense Integration extension that you are using. This is especially relevant when troubleshooting any issues you may experience with our support staff.
Limit import to this invoice/settlement
When the value of this field is “0”, it has no effect. If it has any other value and clicking “Get settlements” or “Get invoices,” you only import settlements/invoices that have the specified settlement number/invoice settlement number. This is useful for when you want to run a test import on a specific settlement or invoice, and you have several more settlements/invoices that are ready for import that should not be included.
Please note: When you have finished using this field for testing, remember to clear it again, or you will be unable to import any other settlements or invoices.
Automation with scheduled jobs
Search for Job Queue Entries and click New. For Object Type to Run, select Codeunit. For Object ID to Run, press the three dots and search for one of the following:
-
DimensionSyncZbn
-
VendorSyncZbn
-
ImportSettlementsZbn
-
ImportInvoicesZbn
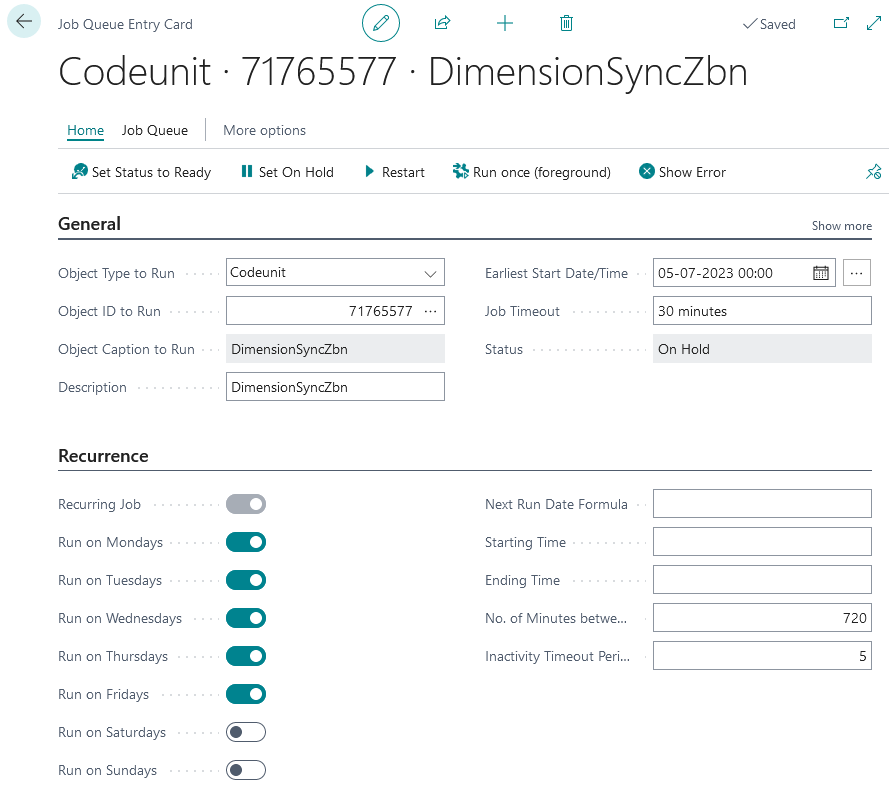
Under Recurrence, you can choose the days that you want to run a job. You can also choose the frequency with which the job should be run. In the example above, dimension synchronization is set to run twice daily on weekdays. When you are ready, click Set Status to Ready.
Please refer to our EULA for how frequently you are allowed to run individual job types.
You can monitor your jobs by searching for Job Queue Log Entries, where you will also be able to see any error messages.